I've had many a long gaze up at Mt Torlesse as I bike to work each day, its' summit clearly visible from my home town, and with a perfect forecast the time had come to make a bid for the summit.
Mt Torlesse stands at 1961m, but is only the 4th highest peak on its' namesake range, with Castle Hill, Back, and Otarama Peaks all higher than Torlesse. Nonetheless, to climb Mt Torlesse still represents a significant challenge, not in terms of technical climbing, but in the 1340m altitude gain required to reach the summit.
Mt Torlesse and its' associated range are named after early Canterbury surveyor and landowner C.O. (Charles) Torlesse. Torlesse was a surveyor with the New Zealand Company, coming to New Zealand in 1841 for a short time, before leaving and then returning in 1848. He carried out much exploration of the Canterbury area, and owned Fernside and Birch Hill runs during his pastoral days. He was the first person (besides perhaps local Maori) to climb Mt Torlesse, and thus it bears his name today.
Initially I had planned to make a direct summit of Torlesse, using the standard ascent route up the SW spur, then travel along the ridge over Junction Peak and round to Red Peak, before dropping back down to the valley floor off of Red Peak. However, with a decent snow fall earlier in the week and the fact that this was a solo trip, I had alternative plans if that route didn't look viable when I got up there.
Expecting a long day, partly due to my constant stopping to take photos!, I left home early, and was parked up at the entrance to the valley shortly after 6am. A quick tightening of my boots and I was off, setting off up the Kowai in darkness but, having been up this valley before on our trip to The Gap (see
here), I knew it to be easy going to the hut about an hour up the valley.
A good frost gripped the valley floor, the way ahead sparkling as the light from my headlamp hit the frozen grass. Initially I followed an easy vehicle track up the true right of the Kowai, across grassy flats until it reaches a collection of beehives on a bank above the river. Here the track dropped down to the riverbed, becoming indistinct, and it was here that I lost the trail. As I discovered on my return, it really wasn't that hard to find - I should have just followed round a large rock and picked up the track in the grass beyond.
Losing the trail however wasn't a big deal, as the riverbed offers good travel anyway, and so I quickly decided to forget the track and just carry on up the river, crossing at will to cut bends and the like.
I reached Kowai Hut in just over an hour, and popped inside to record my various intentions, having still not decided on a final route, although that decision would be made soon enough.
Kowai Hut (also known as John Heyward Memorial Hut) was built in 1983 by Lincoln University to house scientists working in the upper Kowai studying hydrology and erosion. It has 4 bunks and a logburning fire.
From the hut I dropped back down to cross a small side stream before heading up onto a small terrace which would enable to me scout out my route options. Things looked straight forward on Torlesse, with the prospect of snow on the final approach to the summit, and the ridge round to Red Peak appeared to be easy going also. The difficulty was going to lie in the descent off Red Peak, down the steep south spur that was still carrying a reasonable amount of snow. But it wasn't the snow I was concerned about - about halfway down the terrain changes from rock to snowgrass, and there's a very steep 200-300m band of it on the spur. Anyone who has traveled on steep, wet snowgrass will know how treacherous it can be so I erred on the side of caution (being alone and all) and settled on an alternative route.
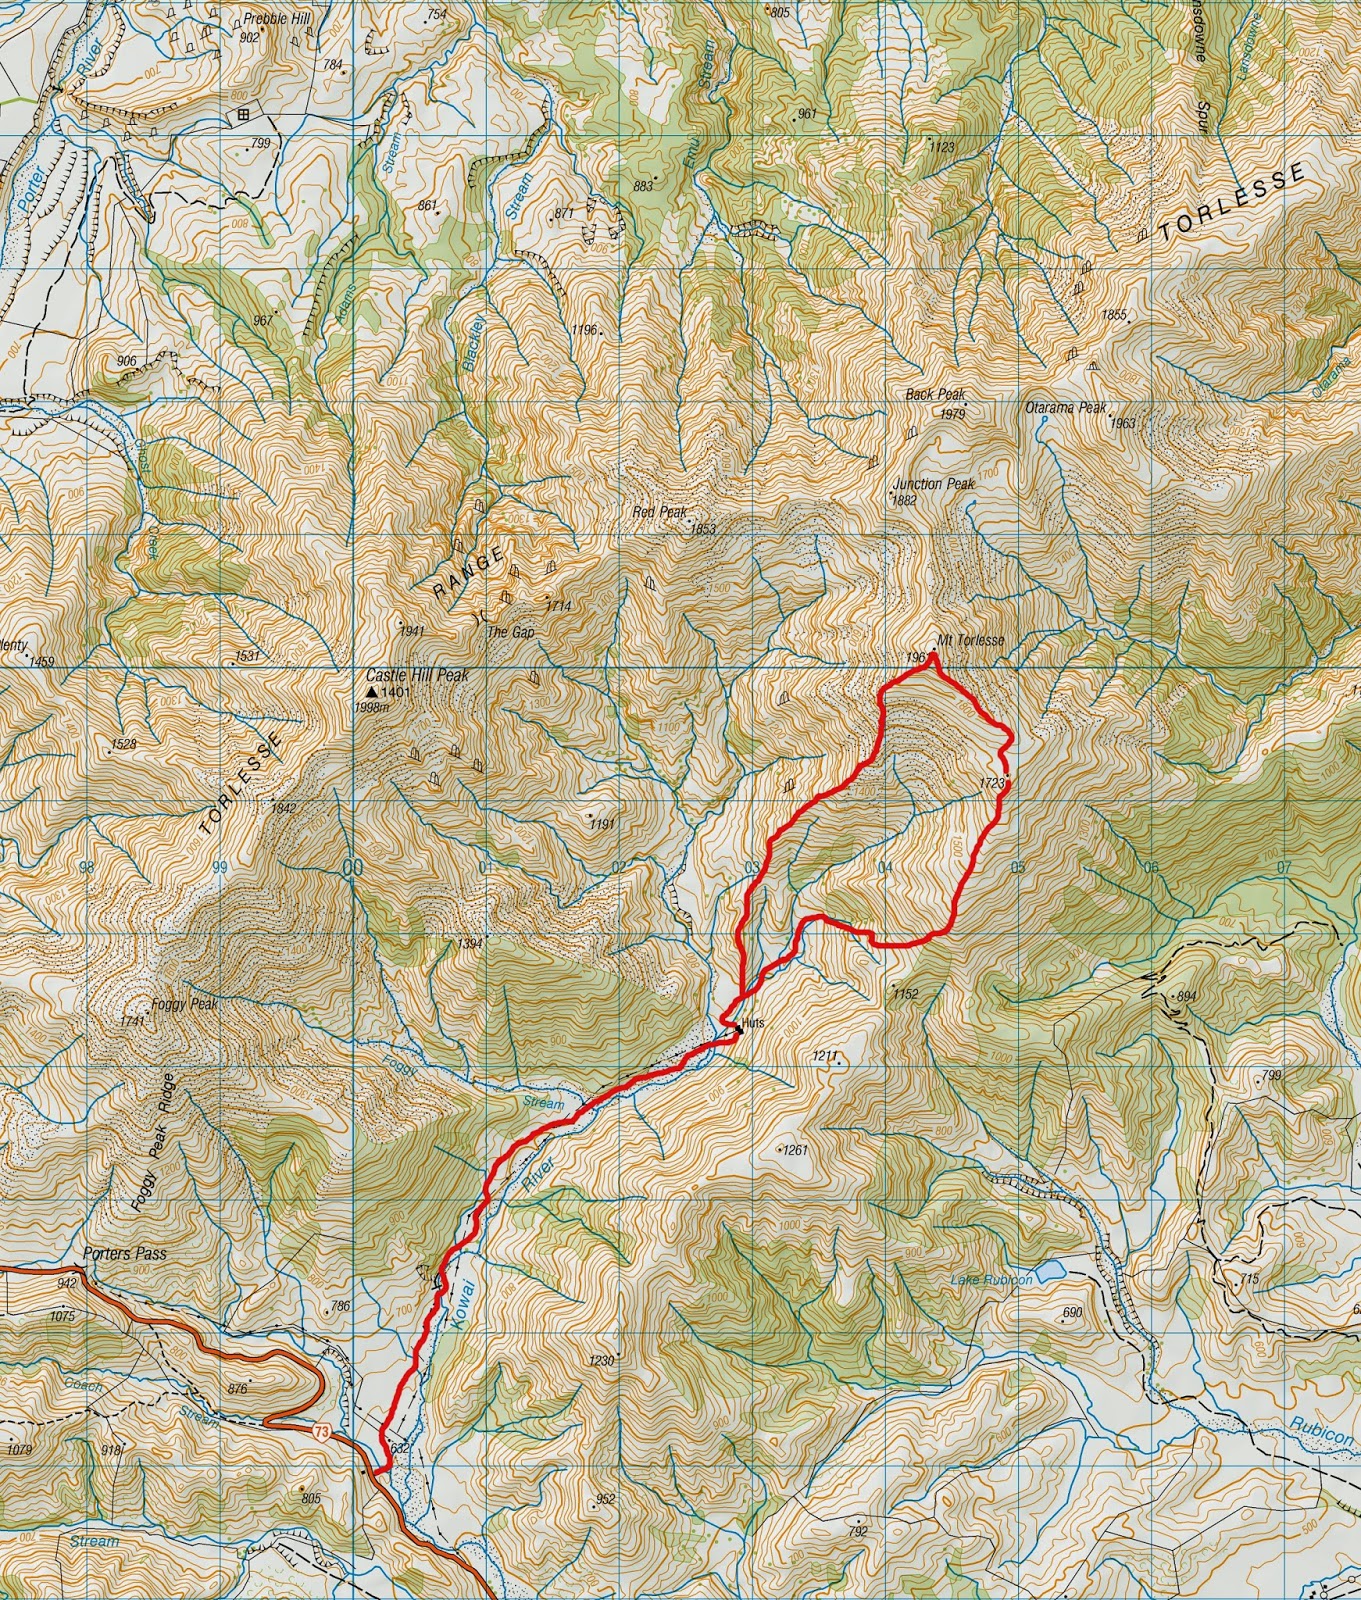
My alternative was to head on up the side stream that comes down past the hut, then find as scrub-free route as I could up a spur to gain the ridge at a saddle just north of Pt 1152m. From there I would climb the south ridge of Mt Torlesse, passing over Pt 1723m and on to the summit. From the summit I would descend the SW spur that is the usual ascent route, making for a quick return to the valley floor.
I set off up the side stream, using whichever side made for the easiest travel, reaching the point where I turned up out of the valley easily after a series of grassy sections alongside the stream. Looking up at the spur, the scrub appeared to be extremely thick, so I started up the bed of another, smaller feeder stream, looking for more open ground on the spur as I went. Unfortunately the opportunity didn't present itself, the scrub dense and impenetrable, so I continued up the small stream, following strong deer trails. Deer, however, can traverse this sort of terrain considerably easier than I can, and the trails had me following several false leads as they shot off up into the scrub.
I eventually reached a fork in the stream. Neither option looked amazing, with the true left branch appearing to get quickly closed in and possibly impassable, while the other looked more open but had the look and feel that it would become difficult sooner rather than later! I went with the more open option, which worked out exactly as I envisaged it, and within 10 minutes I was surrounded by bluffs. A promising line up out of the stream showed me just why the scientists had chosen this area to study erosion, as the rock was completely rotten. Every handhold I tried just pulled away in a soft, rotten, crumbling mess, and it quickly became obvious that to try and climb out was futile.
As I backtracked down the stream I was able to find a small dirt slope that appeared more solid, and this proved to be the case and I was able to climb out and up into the scrub above, which had now reduced to the more typical alpine scrub. As I climbed up I saw that had I taken the other fork, I would have come out into the scrub zone easily, so that would have been a much better option.
My route ahead was obvious now that I was in open ground, and I was able to take a rising sidle up through the scrub aiming for a rock outcrop partway up the slope above the saddle that I had intended to aim for. Above the saddle the ridge climbs very steeply, so by angling upwards I gained height but without the steep gradient...yet!
As I reached the outcrop, it became apparent that the next section was probably going to be the hardest of the day - a steep climb of only 200m, but on some of the loosest rock and scree I've come across in a while. It was truly a case of 2 steps while sliding back 1, and made for a brutal ascent. Brutal it was, but thankfully relatively short, and I crested the top of the steepest section with screaming thighs that were cramping severely from the struggle up the loose slope.
With that behind me the way ahead was much easier, with a gentler gradient to the ridge ahead, and if I wasn't cramping so badly I could have made better time than I did. However, I was happy to keep plodding along, enjoying the views opening up around me as I climbed.
A short, steeper climb up over Pt 1723m had me looking along the final summit ridge, within reach now. Snow lay along the ridge from here but I didn't need my crampons, easily plugging steps along the ridge, until finally I reached the top of one final snow slope and found myself on the summit. It had been 6 and a half hours since I left the car, but all worth it as I stood there on top of Mt Torlesse, with the world seemingly at my feet.
That amazing feeling of reaching the top of a mountain came over me, stunned by the beauty of the view that surrounded me. I'll let the photos do the talking, hopefully they do it justice!
The descent was straight forward, dropping down the steep SW spur. Standing at the top looking down the spur seems to run on forever, as it drops about 1160m to the valley floor. It was a hot, exposed descent in the afternoon sun, but I was able to make good time, reaching the terrace near the hut after 2 and a half hours descending. By now my feet were sore, the constant travel on rock taking its' toll, so I flopped down in the grass for 5 minutes, lying there gazing up at the day's accomplishment, resting and soaking up a few final moments of mountain grandeur before making the trek back down the valley to my car.
A long, hard day, but one that will be remembered fondly every time I look up at the mountain.
 |
| First rays of sun hitting Castle Hill Peak, with The Gap further along the ridge |
 |
| Mt Torlesse (1961m), from the terrace near Kowai Hut |
 |
| Head of the Kowai River, Castle Hill Peak, The Gap, and Red Peak visible |
 |
| Looking across to Castle Hill Peak and The Gap |
 |
| Golden rays lighting up the hills, as I head up the side stream past the hut |
 |
| The main side stream I followed up past the hut |
 |
| Heading up the small feeder stream, bluffs ahead |
 |
| About to be bluffed in the small feeder stream |
 |
| Climbing out of the stream, looking back onto the eroded, rotten rock I tried to climb previously |
 |
| Gaining height, nice view of Castle Hill Peak (1998m), and The Gap (~1700m) |
 |
| Looking back down the Kowai as I reach the loose rock slope |
 |
| Foggy Peak (1741m, far left), and the ridge along to Castle Hill Peak |
 |
| Snack stop at the rock outcrop, and the start of the steep, loose grind. Kowai River below, Foggy Peak skyline just right of centre |
 |
| Looking down one of the many branches of the upper Rubicon River, with the Russell Range in the background |
 |
| Kowai River - the hut sits just out of sight on the left of the terrace lower right corner |
 |
| Vegetable sheep (Raoulia sp.) |
 |
| Looking down the steep, loose rock slope as I slowly inch my way up - a photo was a good excuse to stop! |
 |
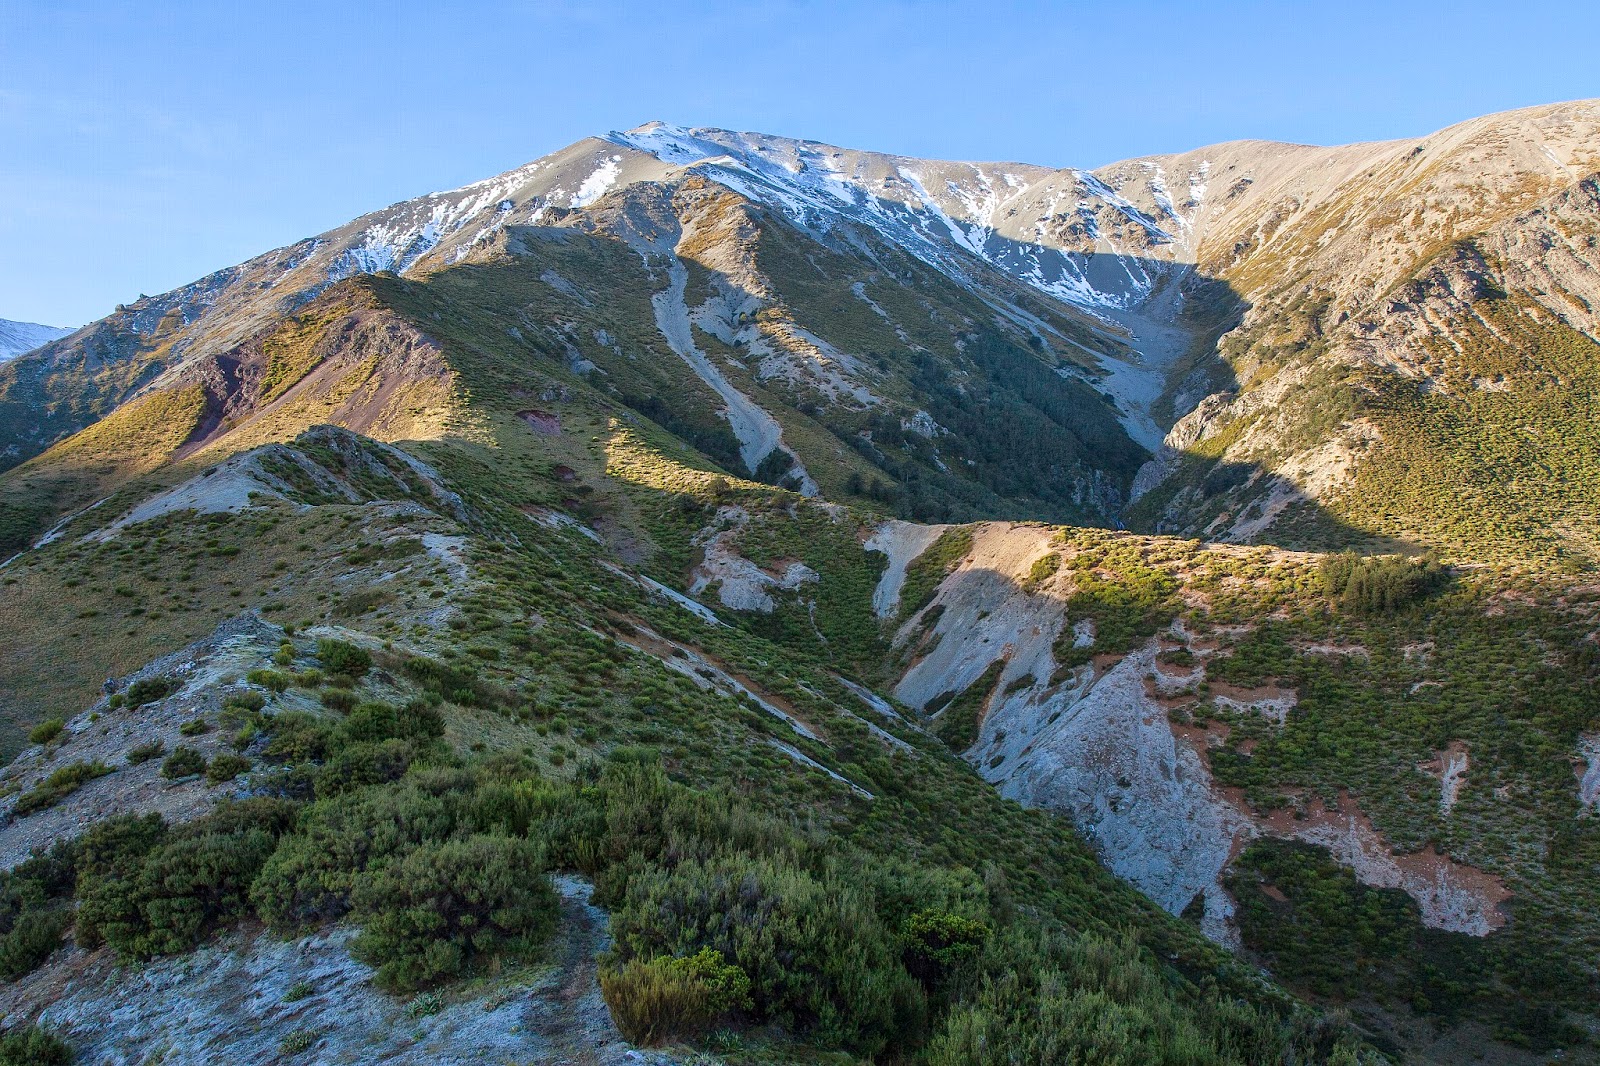
| First view of the summit of Mt Torlesse as I reach easier ground, Red Peak on the left |
 |
| Looking up towards Pt 1723m, with Mt Torlesse to the left |
 |
| The rugged headwaters of the Kowai River |
 |
| Lake Rubicon and the Canterbury Plains, with the Waimakariri River slicing through the landscape, and the Port Hills of Christchurch in the background |
 |
| South ridge of Mt Torlesse, my route to the summit, viewed from Pt 1723m |
 |
| On the south ridge of Mt Torlesse |
 |
| Snow patterns just off the south ridge of Mt Torlesse |
 |
| Castle Hill Peak and Pt 1941m, from high on the south ridge of Mt Torlesse |
 |
| Junction Peak (1882m, left), and Back Peak (1979m), from the summit of Mt Torlesse |
 |
| Looking across Paterson Hill to Mt Oxford (bush covered slopes, left of image) |
 |
| Oxford, my home town - centre image |
 |
| Waimakariri River, from the summit of Mt Torlesse |
 |
| Otarama Peak (1963m), viewed from Mt Torlesse |
 |
| Back Peak (left), and Otarama Peak, from Mt Torlesse |
 |
| Junction, Back, and Otarama Peaks, from Mt Torlesse |
 |
| My initial plan, the ridge from Junction Peak (right) to Red Peak |
 |
| Castle Hill Peak (left), and Red Peak, with profile view of the descent spur off Red Peak |
 |
| Looking along the western half of the Torlesse Range, from Red Peak to Foggy Peak |
 |
| On the summit of Mt Torlesse, with the Canterbury Plains in behind |
 |
| On the summit of Mt Torlesse, with Castle Hill Peak behind, Craigieburn Range in background |
 |
| Summit cairn on Mt Torlesse |
 |
| Looking back down my line of ascent, Pt 1723m far left, south ridge out of frame to the left, and the saddle near Pt 1152m is the obvious dip in the ridgeline |
 |
| Looking down the long SW spur of Mt Torlesse, my descent route |
 |
| Glider (centre image) - it flew right over my head as i descended the spur but instead of grabbing my camera I waved to him! - so not the best shot |
 |
| The lower (and easier) part of the long SW spur, Kowai Hut near trees just past the toe of the spur |
 |
Looking back across to part of the route I climbed earlier in the day
|
 |
| The lower section of ridge I climbed, with the side stream used to access the tops lower right (see below) |
 |
| Route up and out of the side stream. Where my route first bends left, it would have been easier to continue straight and out onto easier scrub |
 |
| Route up to the ridge from the valley floor. Kowai Hut is some distance away to the right |
 |
| Looking up the long SW spur I used to descend from Mt Torlesse. The south ridge I climbed on the way up runs off to the right from the summit |
 |
| The route down (or up) the SW spur of Mt Torlesse |
 |
| Looking across to the complete line of my ascent, from low down on the descent spur |
 |
| Route taken on my ascent of Mt Torlesse |
 |
| Relaxing on the grass back down in the valley, looking up at the day's achievement |
 |
| Crown Copyright - Land Information NZ |
Access: Drive on SH73 from Christchurch towards Arthur's Pass. Before starting the climb proper up Porters Pass, park at the layby under a large tree opposite the old roadman's hut. NOTE: to climb Mt Torlesse you're on private land, contact Brooksdale Station for permission to cross their land (phone 03 318 4748)
Time: Carpark to Kowai Hut 1hr, hut to summit via Pt 1723m 5hrs 30mins, descent to hut via SW spur 2hrs 30mins, hut to carpark 1hr
Map: BW21 Springfield
Hut: Kowai Hut (4 bunks)